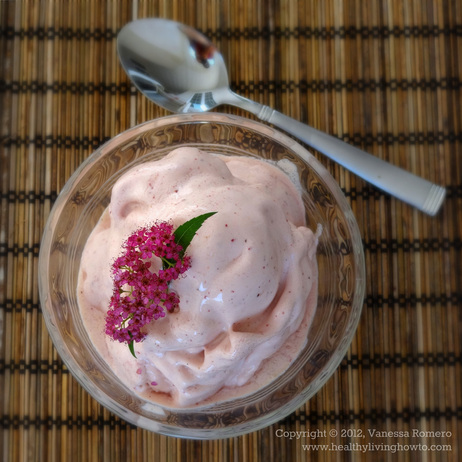
 Oh boy, do I have a treat for you. I've been happily experimenting in the kitchen attempting to perfect a non-dairy ice cream recipe. I realize that may not sound like such a feat, however, sugar-free, non-dairy ice cream making is a little tricky.
Homemade ice cream made in an ice cream maker, typically turns solid as a rock once frozen. The ice cream is only really good straight out of the ice cream maker in the soft-serve state. Once frozen, it just doesn't taste the same to me. There are ways to lower the freezing point with ingredients like glycerine or alcohol, but I wanted an easy recipe that didn't need monkeying around with “specialty” ingredients. I turned to my friend Google and hit the easy ice cream making jackpot when I somehow stumbled on “how to make ice cream in a blender with milk”.
A quick review of the blender ice cream recipe and I instantly knew the changes I was going to make to yield a dreamy and creamy dairy-free and low-carb ice cream. The original recipe calls for milk and ice and somehow my imagination didn't let me believe this would result in anything but “iced milk”. Not what I was going for. So I decided to sub the milk with coconut milk, my favorite is Native Forest Organic Coconut Milk, and instead of ice cubes made with water, I would use ice cubes made with my homemade thick and creamy almond milk. Sub the sugar with NuNaturals Pure Liquid Clear Stevia and you've got yourself a base for just about any ice cream combination you can think of. Vary up the extracts, add in fruit, nuts or chocolate and the possibilities are endless.
Step 1. Make Almond Milk
So, first things first, we need to make a creamy and rich almond milk. Homemade almond milk is nothing like the store-bought, watered down stuff. It is not only healthier, as it has no added preservatives or stabilizers, it is also cheaper, we're talking a savings of nearly 80%. If you've not made almond milk before, it's super simple. Measure out one cup of raw almonds and put them in a jar that has a lid. Cover almonds with cold filtered water, put the lid on and let soak overnight, about 8-12 hours. Rinse soaked almonds and place in a high-powered blender along with four cups of cold filtered water. Process on highest speed for three minutes. Line a fine mesh sieve with an old (clean) t-shirt or kitchen linen towel and strain almond milk into a bowl. Squeeze out all the almond milk and discard the pulp.
Step 2. Freeze Almond Milk
Next, we are going to freeze the almond milk into ice cubes, or rather almond milk cubes. I have no idea if ice-cube trays are all standard or not, but four cups of almond milk required four ice-cube trays and made 64 cubes. They take about four hours or so to completely freeze. Once frozen, pop out the cubes and place in a Ziploc freezer bag for storage until ready to use. We don't want our cubes tasting like freezer burn. I know we are making blender ice cream, but just couldn't move to the next step without giving you this little tip. I've made my protein shakes with these little cubes of milk and it's delicious! Ok, back to the ice cream making.
Step 3. Time to Make the Ice Cream
To make the blender ice cream, I recommend using a high-powered blender. A cheapo $20 blender from Tar-jay probably isn't going to work. The blender has to be robust enough to crush ice to smithereens. No blender, no problem, you can use a food processor. I have a mini Cuisinart food processor and had great success making ice cream with that as well. If you have neither, now you have an excuse to get a new kitchen appliance. We invested in a VitaMix last summer and use it almost daily.
Ingredients
- 10-12 Homemade Almond Milk Ice Cubes
- 1/4-1/3 c. Native Forest Organic Coconut Milk
- 25-30 drops NuNaturals Pure Liquid Clear Stevia
- Pinch Celtic Sea Salt
Directions
In a high-powered blender “crush” almond milk ice cubes. Add in coconut milk, stevia, and salt and process on high until incorporated and nearly smooth. Finally add in extract and any other add-ins, like fruit, nuts or chocolate and process one more time. Enjoy!
Recipe Notes
The VitaMix has a “damper” which allows you to push the ice cream down into the blade. If your blender does not have this, you may need to stop periodically while processing to do this with a spoon. Add in your optional ingredients like fruit, nuts, chocolate etc. once the ice cream has come together. There is a fine line with this recipe between “icy” and “creamy”. It's all in the ratio of almond milk cubes to coconut milk. If your ice cream is not creamy, add more coconut milk and take note for the next time to start with one less cube.
Variations
I realize the variation are endless when it comes to ice cream. I am only throwing out there the ones I have personally made and devoured. I am confident that ice cream lovers everywhere will chime in with their favorite flavors in the comments.
♥ Vanilla: 1/2 tsp. Vanilla Extract
♥ Mint Chocolate Chip: 1/8 tsp. Mint Extract + 1 Tbsp. Dark Chocolate Chips
♥ Chocolate Nut: 1/4 tsp. Almond Extract + 1 Tbsp. Chopped Walnuts + 2 Tbsp. Hershey's Special Dark Cocoa
♥ Strawberry: 1/2 tsp. Vanilla Extract + 6 Medium Fresh Strawberries
♥ Coffee: 1/2 tsp. Coffee Extract + 1/2 tsp. Vanilla Extract
♥ Raspberry Peach: 1/2 Small Peach Cut into Chunks + 8 Frozen Raspberries + 1/2 tsp. Vanilla Extract
♥ Blueberry: 1/4 c. Fresh Blueberries + 1/2 tsp. Vanilla Extract

